Pages

Monday, February 20, 2012

Spring is (almost) here...

It was a nice weekend, the one just passed... We stayed home, we didn't even pop in a shop, and we were together. It's the best thing of all. Just being together.
Another achievement in my little life was that I started Apple Vinegar a few weeks ago, and yesterday, while stirring it, I could actually smell vinegar!!! It's so nice! I felt a bit like Tom Hanks in Cast Away: "I MADE FIRE!"
I'll post the pictures and the recipe very soon.
Another good thing is seeing the beans and peas germinating. I bought a tray with 40 tiny pots, filled them with last year's compost and voila'! After only one week, I can already see the first eight plants!!! I showed my son the small miracle of life happening in our kitchen, and he was so pleased. His smile makes all the difference... And I bet he feels just like me about this, because I let him water the pots on Saturday.
Hopefully we will have some good legumes to store for next winter. The beans I planted are Cannellini, the slim white ones, and Borlotti, the red spotted kind. As a child I remember helping my mother shell the Borlotti beans. It was so nice to sit on the verandah and open the beans and never know what colour they would be and just chat away about all kinds of stuff...
On my last day of sick leave from work, last week, I just took some beans from the pack of dried beans I always have in the stockpile and put them in the compost. The peas I planted were purchased for the purpose last year. And they are sprouting anyway. It's easy to do. These kind of plants do quite well in the Irish climate, and last year from just three plants I got all the peas we needed for the winter.
They are easily stored, shelled and frozen in a bag. They are better than the ones I usually buy dried and they do not need to be soaked overnight before cooking.
I can already smell Pasta with Beans!!!
I am THE optimistic one, uh?  :)

Thursday, February 16, 2012

Sweet and Sour Sauce

Yesterday I was home all day, I was busy with my only hobby: being a housewife. So I spent the day cleaning, re-arranging stuff and sewing. When the two "boys" came home, I realized I had nothing ready. So there came to the rescue my little hand-written recipe collection.
Sweet and sour sauce: easy peasy and in need of very little ingredients:

120 grams of tomato sauce
300 grams of water
240 grams of vinegar
150 grams of sugar (brown sugar is better)

Place all the ingredients in a small pot, bring to the boil, then reduce the heat and let it cook for 10-15 minutes. It won't stick, it won't burn.


In another pan, prepare your stir-fry: it can be chicken, pork, beef or vegetables, depending on your tastes and fridge contents.

I used chicken breast because is my son's favorite. Then I cooked the noodles.

Once the noodles were ready, I drained them and placed them in the plates, topped with the chicken and then the sauce.

Yummy and so, so easy to make. And, believe me, the ready-packed sauce doesn't come close to the taste of a home made sauce!

Easy Risotto - Lentils

Ah, risotto... I remember, as a child, it was one of the few pre-packed things we would eat. From the bag, a wonderful Milanese Risotto would come out. Once in a very long time!!! My mother has never been a fan of ready to eat stuff, it was (and still is) expensive and full of preservatives.

So, I decided to give risotto a try. I saw I have plenty of dried lentils in my stockpile and some pieces of Parma Ham. If you don't have Parma Ham you can use another meat or no meat at all. You'll have a great winter main course, complete with proteins and carbohydrates.

Ingredients:
1/2 cup of Arborio rice for each person
1/2 cup of dried lentils for each person
1 can of tomato "passata" or cubes
Olive Oil
1/4 litre of water for each person
1 small onion
(optional Parma Ham cubes)

Ok, so first thing first, is placing a couple of spoonfuls of olive oil in a pot, adding the ham (if using any) and the lentils. Let this fry for only a few seconds and then add the water and the tomato.
This will be the base. So think about all the possibilities this opens up! You can make the base with ANYTHING!!!

When the lentils are almost cooked, place the chopped onion in a large frying pan with the olive oil and let it get soft but not brown.
Then add the rice and "toast it" for a couple of minutes, stirring with a wooden spoon.
At this point, add the liquid part of your base and let the rice cook.
When the rice is almost ready, add the solid part of the base. Then serve with grated Parmesan on top. It's superb on a wintery evening, and makes you feel so full!!!
The good thing about risotto is that, surprise, it cooks itself! What I mean is that I start the base, I check it again in 10-15 minutes and find it is almost done. At this point I put the pan on and in two minutes the rice is in and it's on its way already. No stirring, no worries! In 15 more minutes I add the solid part of the base and put everything on the table.

While I was soooo busy "cooking" I had the chance to sit with my son and chit-chat about his day at school.

Once more: I LOVE RISOTTO!!!


Monday, February 6, 2012

Super Fast Cheese Scones

Because the oven was on full blast anyway, while waiting for the bread to be ready to go in, I quickly put together some cheese scones. Result: next time I'll double the doses!
They were very very good and so easy to make...

I used:

200 grams of flour
2 teaspoons of yeast
50 grams of vegetable spread (butter will do fine as well)
150 ml of water
Salt
Grated Parmesan
1/2 a spoon of Cayenne pepper

I mixed the flour, yeast, salt, cheese and Cayenne pepper in a bowl. I added the vegetable spread and mixed until I got a breadcrumb-like consistency. Then I added the water and kneaded until the dough was soft.

With the rolling pin, I made it become 2-3 centimeters thick and then cut it in 4 parts. I placed the pieces on baking paper and cooked in the oven for 15 minutes at 200 degrees Celsius. When I took them out, they were high and golden... oh, and delicious!


Pepparkakor Biscuits

This is a delicious variety of Swedish biscuits we sometimes buy in IKEA. Being the IKEA quite a drive away, I decided to make them myself. The outcome was quite surprising and the procedure easy to follow. Next time, I will, however, make them thinner, and I promise I will buy a cookie cutter :)

I found the recipe on an Italian foodblog, written by a Belgian photographer living in Rome. It's an amazingly inspiring read.

The dough for the biscuits had to be made on Friday evening as well, as it needed to stay in the fridge overnight to rest.

The ingredients are:

540 grams of flour
182 grams of butter (or vegetable spread)
140 grams of honey
180 grams of water
50 grams of sugar
1 and 1/2 spoon of cinnamon powder
1 and 1/2 spoon of ginger powder
2 teaspoons of yeast


To make the dough, I heated the water, honey, sugar and spices in a small pot, bringing it to the boil.
Once it reaches the boiling point, I took the pot off the heat and added the butter, stirring until it completely melted.

In a separate bowl, I mixed the flour and the yeast.

Then I added the mixture bit by bit, mixing continuously with my hand. Soon I found out a bit more flour was needed, in order to absorb the whole liquid, until I had an elastic dough.

The dough looks yellow and it smells really nice :)
I placed it in the fridge on a plate.

The next morning, I took it out of the fridge and divided it in 4 parts. Each part was then worked with the rolling pin and cut.


I cooked them on baking paper at 170 degrees Celsius for 15 minutes. If the biscuits are thinner, the cooking time decreases to 10 minutes.


And this is the bounty that came out!


Home Made Bread

There is absolutely NOTHING that tastes like your own bread. Now I know for sure.


What I made was the Italian style, hard crust bread that we use to scoop the pasta sauce after we've finished eating. It's one of the habits we kind of lost along the way of emigration because of the bread difference.


The recipe I found is one specific for electric ovens, like mine. There is definitely room for improvement, but my mother taught me this applies to everything in life, especially bread :)


So, the dough needs to be started the evening before, so it can be left to raise in a bowl for the night. I placed it in a plastic bowl, wrapped it in cloths and placed it in the oven. I didn't want any room temperature change to disturb my precious dough!


What I used:


1 Kg of flour (Ideally 500 grams of strong flour and 500 grams of "00" flour, but the latter is especially expensive and hard to find, in Ireland)
450 grams of warm water
7-8 grams of yeast
Salt


I mixed the water and the yeast in the bowl.


Then I added the salt, I think about 1/2 a spoon of table salt and then I folded in the flour very slowly.
I kneaded the dough until it became this:


At least 10 minutes of kneading are needed. I like kneading the dough, it makes me feel I am really creating something. Some water may be added at this point, if there is still flour flying around.


I placed the dough in the bowl and then in the oven, switched off.


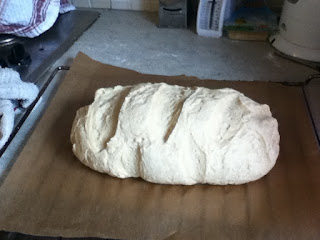
Saturday morning I found this:


What a pleasure! My own dough!!! I gave it the shape I wanted, and then let it rest for another 2 hours:


While waiting, I made sure the oven reached 250 degrees Celsius and baked other "experiments" (details to follow). Once the oven reached the temperature, I cooked the loaf in the oven (without the fan) for 30 minutes. After 30 minutes I turned the temperature down to 200 degrees Celsius and let the bread cook for another 30 minutes, with the fan on.


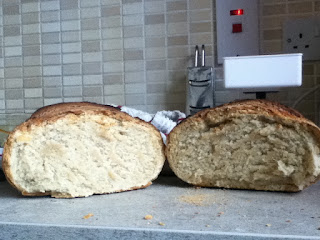
This is what came out, and we all loved it!
The outside
The inside

Busy Bee

Ah, what a good weekend it was... 

Friday night, after putting my son in bed, I started to prepare what I needed for Saturday. I had in mind Pepparkakor Biscuits and Home Made Bread. Then a lot more actually came out of the oven... anyway.

So I will post recipes and pictures, because I was thinking my posts need some pictures, I hate it myself when I search for recipes online and there is no picture...

Wednesday, February 1, 2012

Home Made Washing Powder

Hello again everyone!
Today I'm in the mood for posting, so here we go.

Two weeks ago, while still recovering from a small health problem, I noticed that we had no more washing powder, and so convinced myself it was time to "make" washing powder. So I searched the web for a simple recipe, and the simplest I could find was this one:

600 grams of Marseille Soap Bar (or any other soap bar which is as natural as possible)
300 grams of Baking Soda
200 grams of Soda Crystals (or washing soda)
100 grams of Corn or Potato Starch

If you wish, you can add 50 drops of any essential oil you fancy, like lavender, tea tree...

When I explained to my Spanish friend what I did she said: "Oh, so now you are cooking using the washing machine as well!"

I have to say, this is so easy to do and so safe, I got my son to help.

We simply grated the soap bars with the cheese grater, then added all the other ingredients together in a large bowl, to make sure they would be mixed properly.

Then I placed the powder obtained in an old biscuit bucket. It has a lid that stays on and is quite small so it fits in the cupboard.

With this recipe, we made 1.1 kilo of washing powder, for a total cost of 2 euros.
 In the background, two of the ingredients :)

Pasta Al Forno - Quick and easy Oven Baked Pasta

Yesterday I spent the work breaks looking for a good recipe for the evening. You might think I'm nuts, however, I did find an idea that suited a simple Tuesday evening: Oven Baked Pasta!

Eureka! As soon as we arrived home, after collecting our son from school, I turned on the oven to 170 Celsius. Then I placed a pot of water on the hob to cook the pasta. What I used:

1/2 Kilo of pasta
2 mozzarellas
a few slices of ham

Then I made the simplest Besciamella Sauce ever:

1/2 litre of milk
a few spoons of plain flour
a few spoons of olive oil
a pinch of nutmeg

Bear in mind, I always have nutmeg in the kitchen. It is needed and that's it. Plus, a small jar will last me for a couple of years.

So, to the Besciamella Sauce. Place the oil in a small non-stick pot. Stirring, add the flour and keep stirring until there is no more lumps in the mixture. Let this mixture "cook" on low heat for a few minutes, but never stop stirring otherwise it might burn. Add the milk and keep stirring, turn the heat up a bit and wait... In a few minutes, you will have a thicker sauce. At this point, add a pinch of nutmeg. Cover this pot and remove from the heat.

Second step: Pasta. While the Besciamella was in the making, the water for the Pasta came to a boil. Once I had the Besciamella done, I added the salt (always rock salt) to the water and threw in 1/2 kilo of Pasta. I used a small pasta called conchiglie, which is the one in the shape of a snail... But penne do just fine as well. The only recommendation is not to use long pasta.

Third step: I removed the pasta from the hob when it was "al dente", meaning it was not yet fully cooked, still a bit hard.

Fourth Step: I drained the pasta and placed it in the oven dish, mixing it with the Besciamella Sauce, a bit of Mozzarella cut in pieces (any other cheese will do in this case, especially spreadable soft cheese) and the ham cut in small pieces.

Fifth Step: place in the middle of the oven and in 30 minutes you will be eating a wonderful dinner...

It really takes nothing to cook something nice. It takes more to go to the shop and pick a ready made meal. And this saves money as well, which is always good, right?

PS: I also had enough left for my lunchbox and my son's for today :)